Stage 2: Installing server software
What you need to do
In this stage, you must install the Opera 3 SQL SE
server software using a setup wizard. The Server Administration & Monitoring
utility is also installed. This must be used to configure the server software
after it is installed.
Prerequisites
Actions
Follow these instructions.
1. Downloading the software
Download the latest version of Opera 3 SQL SE
software from the Infor Product Download Center
or Infor Xtreme.
The downloaded software includes two folders; one for the client installation
and the other for the server installation.
Save the downloaded software
where it can be accessed from the server and from each client PC.
In the Client
folder, open the 'Setup.peg' file using a text editor like Notepad++.
On the first line, enter
the name of your server between the quotes. This is used when updating
each client PC's registry to point the client installation to the
server.
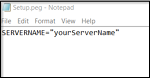
Save the file.
If you are upgrading your software from Opera 3 (Visual Foxpro database)
or Opera 3 SQL, also
download the latest release of that product. The recommendation is that
you also install that and use it when running 'housekeeping' processes
in stage 5 before migrating your
company's data to Opera 3 SQL SE.
2. Installing the server software
On the Opera 3 SQL SE
server, run Setup.exe from the Server
download folder.
Complete the steps in the wizard setup.

See Also
Firewall settings
Server folders
Windows registry updates
Windows Services
Next stage
After completing this stage, follow stage
3 to configure the Opera 3 SQL SE
server software using Server Administration & Monitoring.