Opera Help
Contents : Show
There are various ways in which you can search for records and information within the system.
The Personal Data Search facility searches for personal details of people who have been recorded in the software. This facility is provided so that you can easily find what has been recorded in the software for an individual and where the personal details are recorded.
The personal data found can be chosen to be included on a printed report or in an export file in machine readable format - either XLS or CSV - to send to the individual if required. This is one of the requirements of the General Data Protection Regulation (GDPR).
The To search for Personal Data Help topic explains the steps to follow to use Personal Data Search.
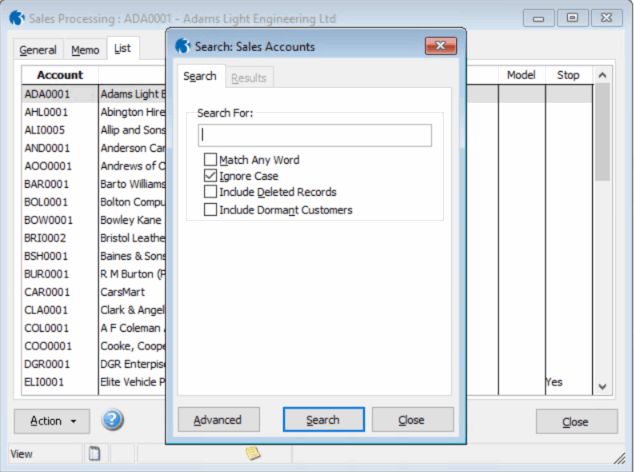
You can use the Search command to locate records on grids and forms. The search for a record is based on a criterion you enter. You enter some text that you want to use to locate the record and define whether the search is for any or all words you have typed and whether the search is case sensitive. You then select which fields in a record are to be searched for a match. Before you can use the facility, you must first open the form that corresponds to the records you want to search. This also determines which fields are searched for a match. If more than one form is already open, the search will only operate on records in the active form.

If the Use Extended Searching option is selected on the Preferences form in the System Manager, text entered in the Search For box will be treated as multiple 'strings' (phrases). For example, if you wanted to search for a customer called SMITH who is located in BRADFORD, you could enter SMITH BRADFORD in the Search For box, then, taking all other search options into consideration and assuming your search included name and address fields, the application would find a match based on the two separate strings 'SMITH' and 'BRADFORD', each of which might be located in different fields (such as Company Name and Address Line 3).
If the Use Extended Searching option is not selected, text entered in the Search For box will be treated as a single 'string' or phrase. For example, if you entered SMITH BRADFORD in the Search For box, the application would look for a match for the text string 'SMITH BRADFORD'; that is, both words would have to occur together as a single phrase in one or more of the fields selected for the search. In this scenario, even if you had a customer called SMITH located in BRADFORD and you searched the name and address fields, the application would produce no matching results if these words did not appear together in any one field.
The default settings for the Match Any Word, Ignore Case and Include Deleted Records options are determined by the options you select on the Preferences form displayed when you use the Preferences command on the System menu.
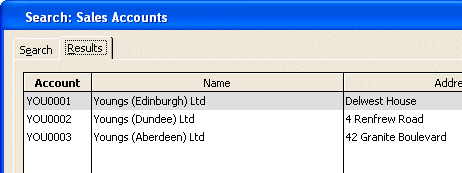
If only one match to the criterion you enter is found, the corresponding record appears in the processing form from which you started the search. If more than one match is found, the Results tab of the Search form displays a list of all matching records from which you can select the one you want to appear in the processing form from which you started the search.
Whilst you can use the Remember form positions and sizes option on the System - User Preferences form to keep changes you make to the position and size of many forms, choose the columns to display and so on, the search results form is not affected by that option.

On the toolbar, click the Search for records matching criteria button. The Search form is displayed.
In the Search For box, type the criterion on which the search will be based. This can be text or numbers.
If you want to specify the fields included in the search, click Advanced and then under Search These Fields, click to select which field or fields are to be search to find a match to the criterion.
If you select the Match Any Word option, the application will search for the occurrence of the string entered in the Search For box anywhere within the selected field(s). If the option is cleared, the search will be for the string appearing at the beginning of the selected field(s).
To match the case of the characters you have typed in the Search For box when searching the records, clear the Ignore Case option. If the Ignore Case option is selected, the search will ignore the case of the characters you have typed in the Search For box.
To exclude records marked for deletion from the search results, clear the Include Deleted Records option.
Click Search. If only one match is found, the corresponding record is displayed in the processing form. If more than one match is found, records are listed on the Results tab of the Search form and you can choose the one you want by clicking once to highlight and then clicking Select or double-clicking the record.
If no records match the criterion you have entered, the message ‘There were no matching records found’ appears. Click OK to try another search.
Many processing forms have a List tab. This displays a list of all the records associated with the command. Apart from being used to view all the records in a particular set, you can use the list to select records for processing. When you display records using the List tab, you can change the order in which records are listed by right-clicking the column and selecting the Sort Ascending or Sort Descending command as appropriate.
Some text boxes relate to ‘key fields’. These are usually unique references that identify a particular record. Some such boxes are shown as list boxes. These are boxes with an arrow alongside. Clicking the arrow opens the list from which you can select an entry. In some cases, you can also type text into the box to search for a matching entry in the list of those available.

Some types of data, for which you may have a considerable number of records, loading all the available records in a drop-down list box would occupy a considerable amount of computer memory and could take some time. Therefore, in such cases, the text box uses a different method for searching and this is indicated by the magnifying glass icon. If you see this type of box, you simply enter part of the description you want. The more complete your entry, the more precise is the list of records displayed. You can then select the record you want from the list displayed.
Searching in key field text boxes operates according to the setting of the Match Any Word option in System Preferences. That is, if this option is switched on and a search in a key field text box is carried out, records are returned if the search text is contained in any of the search fields; if this option is switched off and a search in a key field text box is carried out, records are returned if the search text is present at the beginning of the search fields.
An option on the System Preferences form in the System Manager called Maximum Number of Search Results is used to determine the maximum number of records that are retrieved when you use a searchable text box. A message appears to inform you if more records exist that the maximum specified. The minimum number allowed is 100.
You can use an asterisk or question mark as a wildcard in the searchable text box. For example, both LON and LON* will find records starting with LON, such as LONDON, while *LON* will find records that contain LON. A question mark represents any character in that position, so C?LE finds records starting with C and ending with LE but with any second character, so COLE and CALE are valid results.
Some forms have Memo tabs in which you can type notes. You can search for text within Memo tabs using CTRL+F.
Press CTRL+F to load the Find form.
In the Look For box, type the text string.
You can choose to match the case of the characters you entered by selecting the Match Case option.
Click Find Next.
To clear the Find dialog box, click OK.