Bill of Materials Help
Contents : Show
Use the Processing command to define the structure of assemblies. Any assembly can comprise components of either materials or labour and these components may be assemblies in their own right (known as subassemblies). Careful planning of your assembly structures in advance will help you in constructing the bill of materials correctly, and where subassemblies are involved, you should begin with the lowest level assembly structures first. If you have not already done so, you must create your component stock records first. New assembly structures can be based on existing ones (called models). This is helpful where you have more than one assembly with a similar component structure, as it enables the components of one assembly to be copied to another.
For details about works order/assembly movements, see the Allocate and Deallocate, Issue and Return and Complete (Works Orders) Help topics.
You can create an assembly with up to eight sub assemblies (nine levels in total per assembly).
Box |
Prerequisite |
|---|---|
Assembly Code |
All assembly records are based on existing stock records, so at least one stock item record must be created using the Processing command in the Stock Control application before you can identify an assembly. |
Warehouse |
You may want to create warehouse records in addition to the defaults supplied using the Warehouses form in the Stock Control application before you link assembly or component records to warehouses. |
Item Code |
All component records are based on existing stock records, so at least one stock item record must be created for use as a component before you can identify a component item. As with assemblies, you use the Processing command in the Stock Control application for this. |
All assemblies and components are based on existing stock records and therefore match the reference assigned to the item in the Stock Ref. box on the Stock form in the Stock Control application. For assembly records, the default search references are provided if specified on the stock item record but can be amended to suit the assembly record. The search references can be used as an alternative means of locating an assembly elsewhere in the system.
You can use existing assembly records as templates when you create new ones. When you create a new assembly record, the Options list on the Add Assembly dialog box provides two options:
Create Assembly Without a Model
Create Assembly Using an Existing Assembly
Provided you have created at least one other assembly, you can use the Create Assembly Using an Existing Assembly option to determine default entries for most of the boxes on the BOM Processing form and its associated forms. These defaults can be overridden to customise the record before saving.
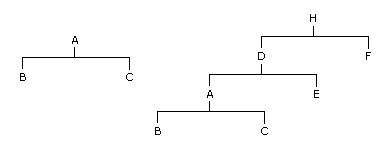
When adding a new assembly record or editing an existing one, the application displays the Assembly Definition form when you have finished the entries on the main BOM Processing form. This form is used to enter and display all the first level components for the assembly. When adding component records to a structure, the application checks the integrity of the assembly structure to ensure it remains valid. For example, a component may be an assembly in its own right. This is called a subassembly. If that subassembly also has components that are subassemblies, the application has to ensure that the assembly is not one of its own components. This can be illustrated by way of example below:
If the above two assembly records existed, the application will make sure you were not able to add D as a subassembly of B or C. Nor would you be able to make A a subassembly of B or C or H a subassembly of B or C. This integrity checking is helpful when creating complex structures, but it is always best to plan your assembly ‘trees’ carefully in advance to avoid such potential problems in the first place.
Component records can be labour items as well as material items. A labour component is identified by the fact that its stock profile is flagged as a labour stock type. If you want to add a description only to the structure, you can leave the component code in the BOM application blank, then enter a reference and description. Such components are printed on assembly structure reports and may be used to help define or clarify a structure, but, of course, have no effect on stock or the processing of an assembly otherwise.
Once you have stored an assembly record with its component details, you can subsequently edit the structure using the Edit command on the Action menu associated with the BOM Processing form.
When you add a new assembly, you can identify the component parts. One or more of these components may themselves be assemblies. These are called subassemblies and they have components of their own. If you imagine your assembly structure as a ‘tree’, the finished assembly is at the top of the tree with its own components. The next level down may include another set of components if one of the components at the top level is a subassembly. You can have as many levels as you need to define the structure of the assembly, and a subassembly or other component can exist on many different assemblies. Two commands on the Action menu associated with the BOM Processing form are provided to help you navigate the structure of an assembly when adding, editing or viewing component records, as follows:
Use this command |
To |
|---|---|
Up |
Move up a level from the subassembly currently displayed in the BOM Processing form to an assembly of which it is a component. When you move up a level, the application presents a list of any higher-level assemblies in a list box so you can select the one you want. If there is only one, the application automatically goes to that assembly record. |
Down |
Move down a level to a subassembly which is a component of the main assembly currently displayed in the BOM Processing form. It only applies if the assembly contains one or more subassemblies. When you move down a level, the application presents a list of any first level components that are subassemblies in a list box so you can select the one you want. If there is only one, then the application automatically goes to that subassembly record. |
If you have a subassembly record selected in the BOM Processing form, you can use the Where Used command on the Action menu to display the Where Used form. This lists the assemblies on which the subsassembly is identified as a component record. The Expand All or Collapse All commands are then available on an Action menu which you can use to show or hide the component breakdown of the assembly records listed in the grid.
Use the View command on the Action menu to display information concerning the currently selected assembly record. You can choose between displaying stock warehouse transactions (where applicable) or a component breakdown.
Box |
Description |
|---|---|
Assembly Code |
A reference that identifies the assembly. It must relate to a stock item record already defined in the Stock Control application. You can select from a list. |
Description |
The standard description of the stock item. The default will be derived from the stock item record, but you can amend this for the assembly record. The description is used to identify the assembly on reports and enquiries and it appears as the first line of description on documents such as works orders. Note that you can also create or amend the extended description using the Extended Description tab. Again this defaults to the entry on the corresponding stock record. |
Search Ref. 1 and 2 |
Two additional references, each using up to 16 characters. These are alternative identities to the main code which you can use to find an assembly by a code other than by the assembly code. The defaults shown will be those associated with the stock item record, but you can override them for the assembly record. |
Warehouse |
You can enter or select the warehouse in which the finished item will be stored once assembled. You can select from a list. If you enter part of a warehouse code, a pop up list will be displayed showing matching entries. Once the warehouse code has been identified, the warehouse description is displayed alongside for reference purposes. |
Kitting |
An option to identify an assembly that is made as soon as a works order has been posted. The result being that all component stock is issued and the quantity specified for the assembly is made immediately. |
Std. Cost/Avg. Cost |
Depending on the stock profile being used in conjunction with the original stock record, this is either the standard or average cost of the assembly item. It is taken from the cost recorded on the stock item record. This can be updated automatically using the Assembly Cost Update command which recalculates the assembly’s cost on the basis of the cost of components that make up the assembly. You cannot edit the cost directly on the assembly record once created. |
Mat. Cost and Lab. Cost |
You can separate the materials and labour costs associated with the assembly. These boxes are unavailable when adding an assembly structure. When editing the structure then values can be entered for material and labour costs. Values can only be entered in the labour costs field if the assembly has labour components. It can also be updated automatically from component labour and material costs using the Assembly Cost Update command. |
Lead Time |
The lead time that represents how many days it takes to build the assembly. The lead time is used to specify the due date on the works order. |
The number of assemblies that must be built whenever the assembly is included on a works order. Where the yield is more than 1, any assembly quantities entered must always be a multiple of the yield. If manufacturing or production is more efficiently served by making a minimum or economical quantity each time, this is expressed as the yield quantity. For example, if it is necessary to build at least 100 assemblies at a time, then the assembly quantity entered on a works order, whether using the BOM application or via sales orders in the SOP application, must be in 100s. All component quantities processed are multiplied by the yield automatically. The default yield quantity for new assemblies is 1. You cannot change this if there are any works orders outstanding for the assembly. |
|
Apply Landed Costs |
An option that determines that landed costs should be applied to this assembly when it is made. Landed costs are those additional costs - other than the unit price costs - that are incurred to get goods you purchase from your supplier to your premises, particularly for goods that are imported. The total cost of a landed shipment includes the purchase price, freight costs, insurance, and other costs up to the port of destination. In some instances, it may also include the customs duties and other taxes that are levied on a shipment. Calculating the landed cost is critical in understanding what a product actually costs so that you can calculate what it can be sold for. Important: Opera does not calculate landed costs for assemblies based on the landed costs set up for the components on the Stock Control - Processing - Landed Costs form. You need to manually add these costs to each assembly. If you do not know what the exact landed costs are for all the components used to make the assembly, you need to estimate these combined costs for each assembly. The costs then need to be added to the assembly item in the Stock Control application. If you use the multi-warehouse feature and have linked the components and sub assemblies to a warehouse, you also need to add the landed costs to the warehouses. These costs will then be included in the valuation of the assemblies on the Stock Control - Reports - Stock Valuation report. Tip: See the To Set Up Stock Control for Landed Costs and the To Set Up Bill of Materials for Landed Costs Help topics for details on the steps that need to be followed to set up landed costs. Landed costs can be included if the Landed Costs option on the System - Maintenance - Company Profiles form is selected and you use the Purchase Order Processing application. |
Dormant |
An option that determines that the assembly is not in use. This prevents works orders being posted for the assembly. An assembly can be made recorded as dormant if:
You cannot record an assembly as dormant if deleted works orders exist for the assembly. To remove deleted works orders, use the Stock Control - Utilities - Period End command. |
Drawing Ref |
You can enter a drawing reference for the assembly if required. This can be printed on assembly structure reports for reference purposes. |
Revision Reference |
You can enter an assembly revision reference for the assembly if required. This can be printed on assembly structure reports for reference purposes. |
Box |
Description |
|---|---|
Item |
A reference that identifies the component. If one is entered, it must relate to a stock item record already defined in the Stock Control application. You can select from a list. You can also leave this box blank if you want to add a description only to the structure. |
Description |
This is the component’s description which defaults to the stock description on the stock record if a component code was entered. If the Item box was left blank, you can type the description as required. |
Ref |
A reference for the component using up to 15 characters, if required. This helps identify the component within the assembly structure and is printed on assembly structure reports. |
Warehouse |
You can enter or select the warehouse from which component stock will be allocated or issued when the assembly is processed. |
Qty |
The quantity of the component used on the assembly. This must be the quantity required to make the yield quantity for the assembly, so if the yield is, say, 10, you need to enter the number of components required to make 10 assemblies. |
Sequence |
A number automatically assigned by the application. Each component record is given a sequence number which determines the order in which it appears in the assembly structure. This cannot be changed when you add a new component, but if editing the component details subsequently, you can amend the number if you want the component to appear in a different order within the structure. You can also use the Move Up and Move own commands on the Action menu to move components up and down the structure, automatically adjusting the sequence numbers. The sequence is incremented in steps of 10. |
Phantom |
This option only applies if the component is itself an assembly (that is a subassembly). Phantom assemblies are those that only exist for the purpose of building an assembly at a higher level. They do not exist in stock as a finished assembly in their own right and therefore cannot be issued separately. For example, an office desk assembly may comprise drawer subassemblies, but the drawers are not stocked individually. Instead, they are only made in order to complete the assembly of the desk. The draw subassemblies are therefore phantom subassemblies. |